Tuesday, 1 June 2010

Story, Sound, Video

Story:

My animation’s story is about, two crabs (Mother and her child) that they are living under a large stone on a beach. One day the thoughtful child comes out of their nest and walks around and to the water front. There the child stands thinking after a while his mother comes out to see where her child is and he is ok or not?

She comes out of her nest and sees him by the water front, she walked toward his child, and suddenly the chid realise that his mother is again walking vary ungracefully, she walks dancingly side to side. He suddenly decides to ask his mother why u r walking likes this. You have to accustom yourself, to walk straight forward without dancing from side to side. She answered: do but set the example yourself, and I will follow you. And the young child then walks up and down by the water front and shows her mother how she has to walk. After that, she turned and went back to go back to her nest, but she was walking straight forward like the child showed her. Very pleased he walked back following her to the nest.


Sound and Video:

Finally I found various MP3’s and composed the child and f the mother sound by two different people and used adobe sound boost edited it accordingly and used adobe premiere pro to add the sound effects to the video.


Forth Sequence:

Third Sequence:

First Sequence:

Second Sequence

Beach And Crabs after rendering:

Beach.avi

Creating River:

River:

For my animation I need a river that the crab wants to walk to the water. For creating the animation in 3Dmax, first of all in Create / Geometry / patch grid, then I choose the Quad patch, next, I made a panel. After that under the Quad patch, I changed the parameters to the size that I want. Then in Modify, I choose the Edit Patch, after that on the top / under the create button, choose Paint selection Region, the last one / the circle one.

Before that I had to select the Vertex sub object of (Edit Patch) then I selected the points that I want my river shape to be. After that I moved the selection down as much as I want the river’s depth. Then for creating the floors shape to looks more naturally, I moved the spots down, up, left or right.

And for creating the Water in the river, I made a box then I put it to the river like a paper or box. Next in Modify I have to add sound, after that at the under the Noise button in setting, I changed the setting like this:

Seed (0) Scale (5.0) Phase (22) X, Y (0) Frequency (0.55) Z (11.0)

And mark the Animation.

Before doing that, when made the box, under setting, I had to change the setting like this:

Length: (250) Width: (420) Height: (0) Length sags: (40) Width Sags: (40)

Height Sags: (1)

Then I opened the Material, in Diffuse: I can choose whatever blue that I like as a water colour. Then in the map:

Bump: (30) Map # (Noise) Reflection: (100) Map # (Flat Mirror)


Explanation of creating and animating bones on crab:


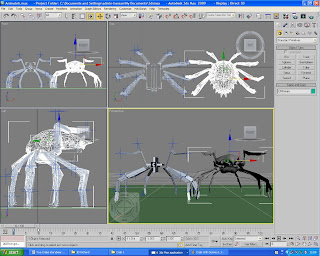
Initially I had to create a concept drawing of the crab. After Creating the Crab that Richard Helped me, I had to animate it. To do that, I had to add bone for the body, for doing that, I converted the whole Crab to group, then convert it to Poly, then press the (Right Click), in object properties / See through. The click on the right arrow, the last picture, bones. (Create/Systems/Bones).

Then I create bones for hands/feet, in three times for 3 parts of the hands move it to the body. Then in to the Modify, I changed the bones size. Then on the right of the body, hide it, then I select all the bones, go to Animation / Bone Tools / Mirror. And then, I moved it to another hand.

(Mesh / Modify)

Then I selected each part of the bones, and add the name, for example: Left arm, Right arm, left hand, Right hand.

Click on the mesh / skin / add, then select all of them make another bone for the body, go to the Mesh / Add / then select all. Then select the head of the bones little piece, then go to the Animation / IK, Solvers / IK, Limb solver.

Then could see the tiny line, click the line to arm.

Following all that with moving the legs and using the Auto Key, I animate the legs like a Crab moves. For walking the crab, I moved the two legs, tow legs together for looking more naturally. After animating the crab/s, I realised it to be too difficult if I want to animate all the steps by step of the crab. Consequently, I used the Dummy tool. Dummy it’s a tool that helps us to move each subject with helping of another subject or box. For example: when I want to move the crab, it’s difficult to select the all of the bones, to do that after moving the legs (Animate them), I have to select all the parts of crab. (Legs, Body, Bones) then in the Group I selected the group and put the name for that. And Crab will connect to the group, (All of the crab’s part). Then I selected the Dummy on Create / Helpers / Dummy, and then I created the box, after that I clicked on somewhere free (I didn’t select anything)

Rendering Crab after animating:

Crab With Texture


Boning Crab:


In order to set up the bones correctly for the crab, i started off with creating one centre piece bone. This would be the parent to all the other bones of the surrounding legs. I then created a structure for a single leg, because all 8 legs are the same i was able to copy this and just edit the angle of each leg individually. Once the bones were created and put in place correctly i edited the fins to fill out the leg model of the crab.

Stone:


Creating stone:

For creating the Stone, first I create a circle, then I convert it to Poly, after that in Vertex I changed the shape that I want to be. Next in material panel, I select the stone texture and put it on my Stone (circle).